|
The 10 Best Soul, Funk and R&B Sample Packs: via LANDR Blog
Soul and funk is the music that gets the people dancing. That’s why so much of it is sampled in hip-hop, pop and electronic—it makes people get up and move. For interesting soul and funk rarities to sample in your music, we’ve compiled this list of the best royalty-free soul and funk samples. You’ll find all kinds of loops begging to be chopped up in your sampler, from dancy funk loops, soulful arrangements to spine-tingling R&B vocals. Get ready to put some funk and soul into your next track. 1. Funky Solid Soul 2
Funky Solid Soul embodies everything you might associate with the neo-soul movement that took over pop in the late 2010s. Get retro synth lines, crunchy percussion and sensual oohs and ahs to inspire your next neo-soul track. Our favorite sample from the pack: 01 093 bpm 2. The Soul Cinema Vol 1
Low-key, dramatic horn arrangements that sound like they’re straight out of a Wes Anderson film. The Soul Cinema sample pack is a great opportunity to find gritty horns and vintage recordings that evoke the golden days of art-deco theatres and soul’s formative heyday. Our favorite sample from the pack: THE SOUL CINEMA SNIPS VOL1_When love Runs_120bpm_.Em 3. Soul Pack
Keys are the backbone of so much good soul music. Sure, vocals are often the focal point, but there wouldn’t be soul music without high caliber Rhodes, Wurlitzer or piano playing.
Soul Pack is full of keys samples that are ready to make a good base for your soul-inspired track. Get sensual chords, tasty lead lines played by pro keyboardist Jon Solo at his Brooklyn recording studio. Our favorite sample from the pack: gospel_wurlitzer_keyGMaj_95bpm 4. Soulful Pop Vocals 1
Everyone knows the most important of any soul tune is the vocals. Cutting up a catchy vocal hook sample into your neo-soul track is what you need to make your track pop.
In Soulful Pop Vocals you’ll find over 500 juicy vocal lines, ready to sparkle in over your next soul track. Our favorite sample from the pack: 05 Vocal SP1 19 – 123 BPM – F#m 5. Songstress Sounds
One of the coolest genres to rise in popularity in the 90s was neo-soul.
The way it combines elements of pop and hip-hop production with soul-inspired vocals and arrangement made it incredibly interesting to experiment with. In Songstress Sounds you’ll find samples that re-create the complicated chord structures, retro-synths and hip hop drum production typically associated with neo-soul. Our favorite sample from the pack: SSS 02 Instruments+Bass 054bpm Dm 6. Late Night Jazz Vol 1
Soul and funk composition draw heavily on jazz. That’s why you should absolutely sift through jazzy samples and records if you plan on writing a funk or soul track. Late Night Jazz is chock-full of great royalty-free jazz samples—whether you’re looking for jazz drums, chord progressions or vocals. Our favorite sample from the pack: AN_LNJ2_02_Piano_009-014_144_C_Major_Tail 7. Urban Made Piano Vol 1
Urban Made Piano is a highly-curated selection of 35 jazzy piano loops. The pack is perfectly designed for chopping up and sampling. One listen through this sample pack will inspire you to make anything from hip-hop to a jazzy pop R&B track. Our favorite sample from the pack: Urban Made Piano V1 86 – Gm 8. Dark Woods
Truly inspired piano loops are what you’ll get on Dark Woods. Find 50 perfect grand piano loops that evoke the sounds of soul, funk, jazz and even classical. If you’re looking for a piano loop to inspire your entire soul, funk or R&B track, this is an excellent place to start. Our favorite sample from the pack: Grand Piano 160bpm – Am – My Dear 9. Upright Bass 2
The bass is easily one of the most important instruments you need if you want to authentically recreate soul or R&B.
That’s because it’s a staple in jazz—the father of soul. In Upright Bass, you’ll find pristine recordings loops of the classic instrument that are absolutely perfect for building the basis of the song. Our favorite sample from the pack: 18 Upright Bass UB2 17 – 118 BPM – E 10. Raw Funk
Funk is all about the groove and feeling. Whenever you hear something that truly funks you up, you need to get in on the action. In Raw Funk, you’ll find chunky guitars, hard-hitting drums, crunchy keys, singing horn arrangements and more. Our favorite sample from the pack: IF_RF_Drum_Loop_10_94BPM The post The 10 Best Soul, Funk and R&B Sample Packs appeared first on LANDR Blog. from LANDR Blog https://blog.landr.com/soul-samples/ via https://www.youtube.com/user/corporatethief/playlists from https://stevehartcom.tumblr.com/post/630890559989547008
0 Comments
Mixing Drums: How To Get a Powerful Drum Sound in 7 Steps: via LANDR Blog
Mixing drums is one of the most satisfying parts of music production. Drums propel the rhythmic action of a song and getting them right is a great feeling. But mixing a good drum sound can be hard when you’re just getting started Even so, you can get results if you know how to apply a few key techniques. In this article I’ll show you how to get a powerful and punchy drum mix in 5 steps. Let’s get started. 1. Create busses to organize your tracksThe first step to mixing drums successfully is to set up your tracks right. That means creating busses to organize the tracks and process them in the right places. To start you’ll need a main stereo bus for the entire drum mix.
With the output of your individual mics routed to this aux channel you’ll be able to apply processing to the entire drum sound and adjust it’s overall level. You should also create mono busses for any drums that have been mic’d with multiple microphones, like if you used a snare top and bottom mic. Set these busses to output to the main drum bus as well. Finally, you should create a separate bus for the left and right overheads so you can adjust them independently. Here’s a diagram of drum tracks properly bussed out for mixing.
2. Use expansion for extra punchWhen most engineers record drums, they place microphones in the room, over the drummer’s head and up close on each individual element of the kit. The close mics are how you turn up specific sounds like the kick and snare to work best in the mix. But no matter how well they’re placed, drum close mics will capture some bleed from the other sounds in the kit.
If the bleed is too loud, you won’t be able to push the close mics up in the mix without adding distracting background spill from the cymbals. To reduce it you can use expansion. An expander is like a compressor in reverse—it reduces the level of the signal when it drops below the threshold instead of when it goes above. You might know about expanders if you’ve ever used a noise gate. Many engineers use gates on drums, but they can make the drums sound choked and unnatural. In most cases you don’t need to completely remove the background noise—just decrease it enough so that it’s not interfering with your mix. Here’s a nice explanation of how you can use expansion to clean up drum close mics. 3. Compress in parallel to add weightCompression is important for mixing drums, but it can be easy to go too far. Heavy compression can sound great when the drums are solo’d, but it can make them disappear in a full mix. So how do you get the sonic benefits without losing the punch? Compressing in parallel is your best option. To do it you’ll need a compressor plugin with a mix knob or a separate send and aux return channel for your compression sound. With the compressor set up in parallel you can use an aggressive setting that adds weight and power to the sound and blend the natural transients back in. Here’s an overview on parallel compression to get you started: 4. Add reverb to create ambience and depthDrums are acoustic instruments that you normally hear in a reverberant space. That means they need some ambience to sound natural and three dimensional. Many engineers rely on microphones placed at a distance to create these qualities. But if you don’t have those, reverb plugins can work just as well.
You’ll have to create another bus to send the drum tracks to a reverb plugin. To make it convincing you need to be careful with the blend of sources you send. In the past it was common to send only the close mics to the reverb, but this can result in a slightly strange ambience texture. With expansion on these mics the effect is even more pronounced—it’s a specific sound that was popular in the production style of the 80s. If you don’t have any room mics, I recommend adding subtle reverb to the overheads instead of only to the close mics. 5. Use saturation to stand out in the mixSo far the drums are sounding nice and clear with solid power and convincing ambience. But even then you might struggle to push them forward in the mix. One way to put your drums right up front is with harmonic saturation. This is the subtle distortion that adds complex harmonics to your sound and makes it more present in the mix.
Most plugins that create this type of distortion are based on analog hardware. Old electronic components like tubes, transformers and magnetic tape are famous for their pleasing sound. Engineers used these processors to enhance their mixes with saturation. Here’s a nice clear example of how a tape machine plugin can push the midrange and add pleasing saturation to the sound. 6. Blend in samples for textureThe DAW era gave engineers access to many new tools to enhance their mixes. It’s common in many genres to replace individual hits in the drum mics with samples to change their sound. If you’ve followed this guide and your drums still don’t have enough impact, you might consider this approach to help fix it. To trigger samples with your drum mics you’ll need a sample replacement plugin. These plugins detect the transient of the incoming audio and play a sample back when the level hits a certain threshold. Replacing every single hit in your drum mics is pretty extreme, but subtly blending in samples with your real drums is a great way to reinforce them. Here’s an easy way to trigger samples with your drum mics using built-in tools in Logic Pro X. 7. EQ your drums to match the rest of the mixYou might be surprised that I’ve left EQ for last in this tutorial. But if you can get your drum mix sounding good using the techniques in the previous steps you might not have to do much EQ at all. Besides, every mix is different and it’s hard to give advice about which specific frequencies you need to address in yours. Despite that there are some common places to add EQ while mixing drums:
Here’s some more info on how the low elements in your mix like your kick drum and bass sounds interact: Powerful drum soundsEveryone wants a bold, punchy drum sound that pushes the track forward. With the techniques from this article you’ll have a strong head start on getting your drums right. Now that you have some ideas for mixing drums, get back to your DAW and keep working on your mix. The post Mixing Drums: How To Get a Powerful Drum Sound in 7 Steps appeared first on LANDR Blog. from LANDR Blog https://blog.landr.com/mixing-drums/ via https://www.youtube.com/user/corporatethief/playlists from https://stevehartcom.tumblr.com/post/630792429703921664
The 5 Best Synths for Beginners at Any Price Range: via LANDR Blog
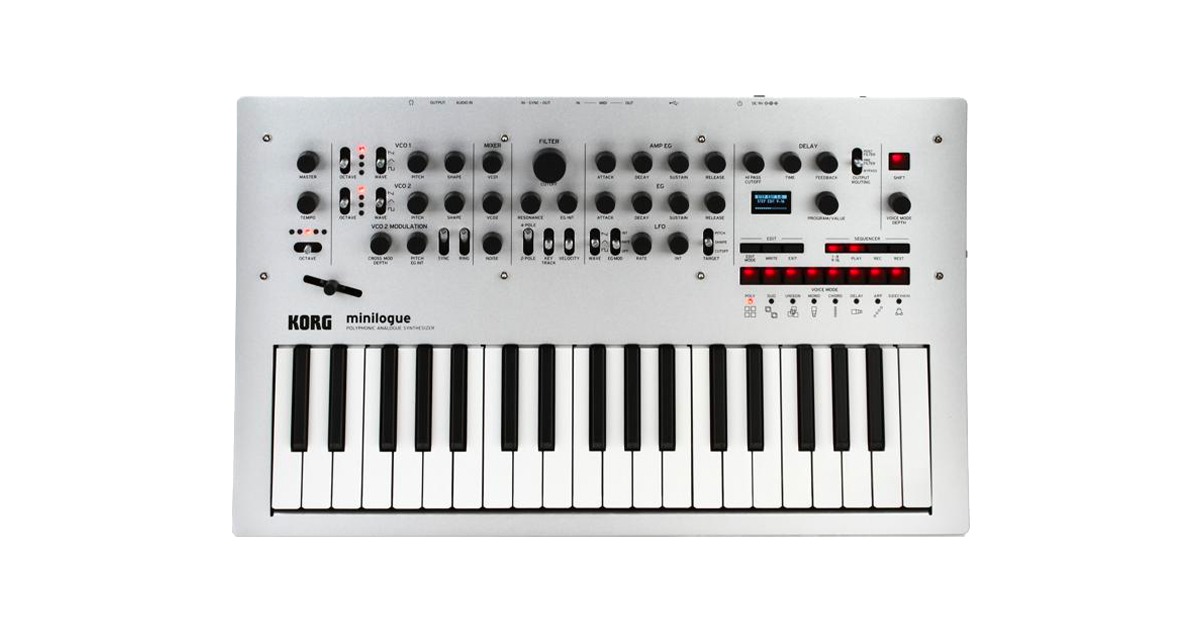
Getting your first synth is always a big step. Sure free synth VSTs open infinite possibilities but the DAW screen and keyboard is a big limitation that sometimes kills creativity. Hardware synths are so inspiring—hearing an analog sound change as you play with real knobs is fun and also helpful for learning how electronic sound works. Plus, hardware synths are much easier to use in collaborative contexts, especially if they’re portable. But finding the perfect synth to get started with isn’t always easy. Hardware synths can get expensive quick—plus there’s all kinds of confusing synth terms to wrap your head around. To get you started on the right foot and help you know what you’re really getting, we’ve compiled our top 5 best synths for beginners. 1. Korg Minilogue
I’ll start this list with one of my favorite modern synths—the Korg Minilogue. So many artists I know love this synth and the times I’ve gotten my hands on it have been an absolute blast. There are a few reasons why it’s a great synth for someone who’s just getting started. Number one—it’s polyphonic, meaning you can play multiple notes at once. That makes it possible to get huge pads that you can use in so many different ways. Secondly, it has dedicated knobs for pretty much every function. That’s huge because the most fun way to learn synthesis is by hearing how a sound changes as you play with a certain knob. Nothing kills your creativity more than a session spent diving through menus. With the Minilogue you won’t be doing that very often. There’s so much more I could say about this synth—it has a great sequencer, arpeggiator, tons of cool presets, a small footprint, option to change polyphony settings… the list goes on. At $499 USD, the Minilogue does come in at a higher price than other synths on this list. But if you’re serious about committing to learning and using synths it’s completely worth it. 2. Arturia MicroBruteThe Arturia MicroBrute is your best option if you’re looking for a very hands-on, analog synth. This synth has an incredibly classic sound to it, all packaged in a very compact box. While it’s a monophonic synth (it can only play one note at a time), that doesn’t mean it lacks power. You get four huge oscillators that can be combined—triangle, square, saw and sub. Each oscillator comes with its respective signal enhancer—metallizer, pulse width modulation, ultrasaw and overtone. To mold your sound you get dedicated knobs for filter, amp envelope, LFO and a sequencer. And if you’re interested in getting into Eurorack down the line, it even has a mod matrix for circuit bending with CV. The MicroBrute really is the perfect synth if you’re just looking for an instrument with raw synthesis capabilities that’s easy to understand and play with. There’s no menus to cycle through—just knobs and pure synthesis fun. At $349 USD, you’re getting a very fair price for something that comes with a ton of synth capabilities right out of the box. 3. Korg Volca Series
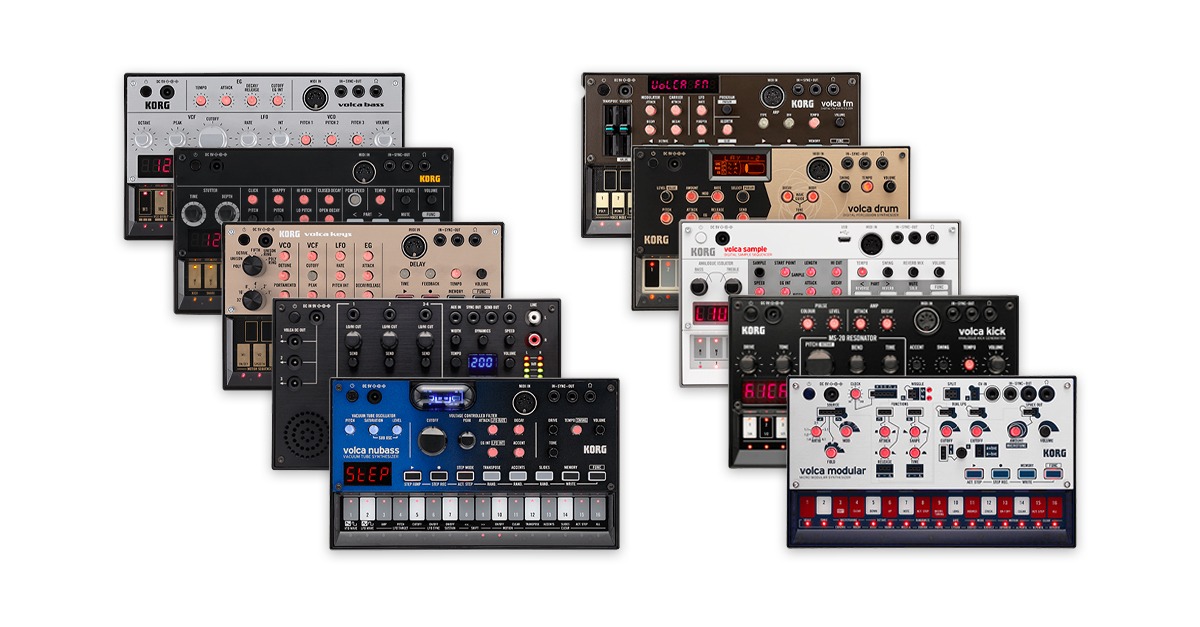
The second most affordable synth on this list is the Korg Volca series. There are many versions of the Volca and each have their own uses. There’s the Volca Keys, Volca Bass, Volca Modular, Volca NuBass and my personal favourite, the Volca FM. Each Volca comes as a dedicated synth engine for a specific purpose. For example, the Volca Bass comes parameter and effects specific to a bass synth, whereas the Volca FM focuses on the characteristics that normally come with an FM synth. What I love about the Volca series is that they sound really good and come with tons of synthesis capability in a very compact and affordable package. If you’re missing a specific synth from your setup, there’s likely a Volca variant that will fill the gap. They easily connect to your setup through either MIDI or CV but you’ll most likely want to control them with a MIDI keyboard. For a simple, intuitive and compact synth, the Volca series synths are absolutely something to check out especially at a $149 USD price tag. 4. Roland Boutique Series
Roland is well known for designing several synths that defined a generation of music. Classic synths like the Juno-60, the SH-101 and the TB-303 come to mind. You may want to get these classic sounds in your tracks, but these vintage synths are hard to find, difficult to maintain and are often quite expensive. That’s why Roland’s Boutique Series is so cool, it’s a handful of compact synths that re-create the sounds of their classic vintage counterparts. What you get with each boutique synth are all the sounds, knobs and effects that came with their original vintage inspiration in a small box that’s easily controlled with MIDI. Yes, you’ll need to buy an external MIDI keyboard, but if you’ve already been playing with synths in your DAW you probably already have one. The Boutique line does come at a boutique price; each synth goes for around $499 USD. But considering how much vintage Roland synths go for on the used market, you’re getting a fair deal. 5. Teenage Engineering Pocket Operator Series
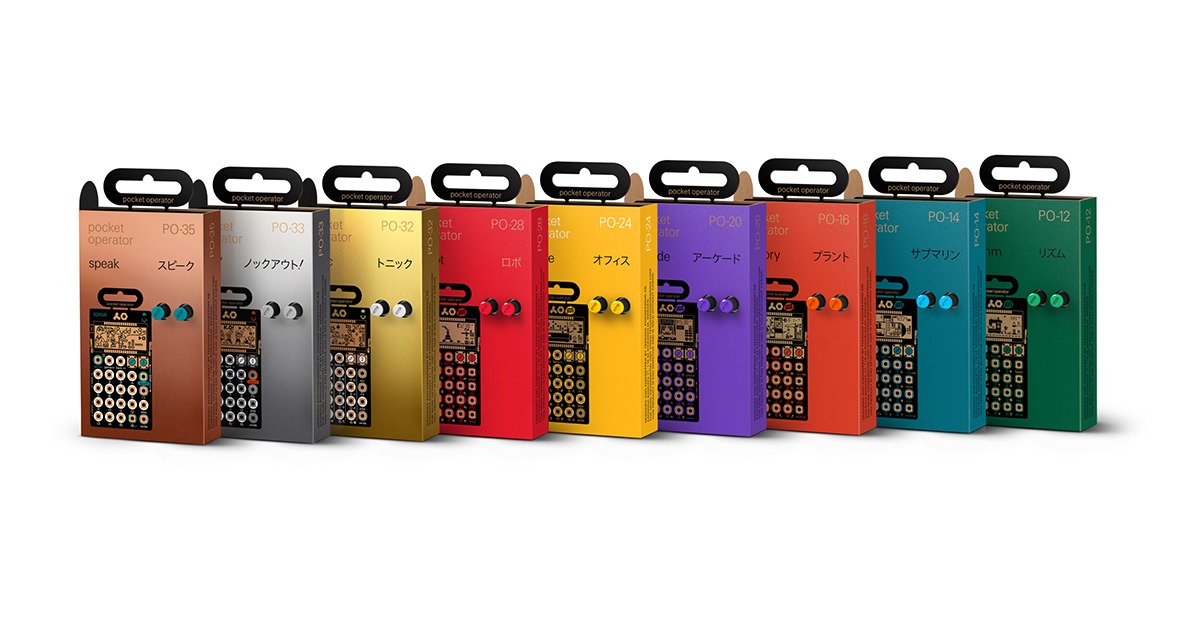
If you’re looking for an affordable way to have fun making weird sounds by playing with raw synthesis, Teenage Engineering’s Pocket Operator is definitely something to check out. The Pocket Operator isn’t like any other synth on this list. There’s no keyboard and it’s about the size of a credit card—but that doesn’t mean it won’t pack a punch. Essentially, the synth is built into a very simple circuit board that’s controlled by an array of buttons and knobs. There are several variants of the Pocket Operator, each having their own and synthesis qualities. The exact function of each variant of the Pocket Operator is hard to describe, though you’ll find a sub synth, drum synths, sequencers, voice modeling synths, samplers and more. The point of the Pocket Operator is not to obsess over what specific duty you want your synth to perform—rather, this is a synth that’s purely intended for fun and experimentation. Starting at an unbelievably low price point of $49 USD, you’ll be smiling as you eke out strange and cool sounds from your new synth.
The post The 5 Best Synths for Beginners at Any Price Range appeared first on LANDR Blog. from LANDR Blog https://blog.landr.com/best-synth-for-beginners/ via https://www.youtube.com/user/corporatethief/playlists from https://stevehartcom.tumblr.com/post/630241286413221888
Robert L. Smith: How Music and Technology Meet in Mixing: via LANDR Blog
  
  The post Robert L. Smith: How Music and Technology Meet in Mixing appeared first on LANDR Blog. from LANDR Blog https://blog.landr.com/robert-l-smith-mixing-technology/ via https://www.youtube.com/user/corporatethief/playlists from https://stevehartcom.tumblr.com/post/629980817438932992
Hard Truths: You’re Going to Make Mistakes: via LANDR Blog
Managing a big session or a busy mix is tough. You have to keep a lot of different factors in mind to make it a success. Even just tracking a single vocal can result in a confusing mess of incomplete takes if you don’t pay close attention. Trying to stay creative while balancing these practical issues is a recipe for error. Here’s my hard truth for today: you’re bound to make mistakes, no matter how hard you try. But that’s not meant to be discouraging. If you have the right approach you can judge which mistakes matter, when to overlook them and when to double down and fix them. Here’s why you shouldn’t be afraid to make mistakes while producing music and how you can avoid the worst of them. No going backMusic happens in the moment. Whether you’re having a good day on your instrument or you just happened to stumble on a perfect analog synth patch, sound happens in real time. The same goes for mixes. If you lose your work because of a hard drive failure or a saving issue, you probably won’t be able to recreate the same mix exactly. That’s one of the main reasons that mistakes can be so costly. There’s probably no worse feeling than seeing a nearly perfect take ruined by a small technical error. With all that on the line, getting it right at the source is always your best option. But when that isn’t available, you’ll have to deal with the mistakes in the best way possible. Play it againIn the heat of the moment, It may seem like you only have one opportunity to make every single sound perfect. But all you really need to know is when to cut your losses and start over. It’s almost comforting to know that even if something goes truly wrong you can just try again.
But many inexperienced producers burn time and energy trying to fix it anyway. It’s natural. Once you’re invested in something you want to see it work out, no matter how much extra work it takes. Too often, you could save plenty of time by just redoing it and avoiding the problem entirely. In many cases, making a mistake means you’ll have to start from scratch. It could be as a minor as tracking the bass line again, or as serious as starting the song over. But that shouldn’t make you feel too discouraged. You might be surprised how often you’ll do a better job on the second pass. The next best thingLuckily, modern producers have plenty of solutions for the most common problems that come up during the process. I’m talking about lifesavers like audio editing, vocal pitch correction, virtual instruments and MIDI. But that doesn’t mean you can get lazy and leave everything to fix at the end. You’ll still get the best results if you do your best to get what you need in the first place. Even so, every producer should be familiar with the tools and techniques that can save the day when it seems like all is lost. Here are the top tools and techniques you should learn to help you fix mistakes
Recording and mixing technology improves every year. Some of this tech can come to your rescue, but there are still mistakes out there that nothing can fix. Those are the ones to recognize and watch out for. When to worryWhen you’re trying to think on your feet, you’ll have to make some snap decisions. The toughest kind are about how to use your time effectively. All sessions have time constraints, even if they’re only from how long your collaborators can stay focused. That means keeping up momentum is important for results and workflow. The easiest way to stall a fun and productive session is to get stuck on fixing a small mistake. So how do you know what approach to take? Here’s my best advice for deciding:
Developing the instincts to answer these questions takes time, but it’s part of good intuition as a producer. When to let it goGetting something wrong might be agonizing when you realize it, but in many cases, simple mistakes won’t sink your mix. In fact, learning to live with your mistakes is a sign of creative maturity.
So far I’ve talked about fixing mistakes, or trying to avoid them in the first place. But there’s actually a third option—put them in anyway. It’s easy to get fixated on your perfect vision for a track. If you’re laser focused on making the details perfect, you miss out on the charm of what you didn’t intend to happen. Mistakes happenYou can’t worry too much about mistakes if you want to have fun making music. And that’s OK. Between being prepared, knowing what you can fix and knowing when to start over, small mistakes shouldn’t stop you from finishing your track. The post Hard Truths: You’re Going to Make Mistakes appeared first on LANDR Blog. from LANDR Blog https://blog.landr.com/hard-truths-mistakes/ via https://www.youtube.com/user/corporatethief/playlists from https://stevehartcom.tumblr.com/post/629973906728665088
Staff Picks: 7 LANDR Distribution Artists We Loved in September: via LANDR Blog
Thousands of artists trust LANDR Distribution to get their tracks on streaming platforms worldwide. But did you know we listen to every single submission? Here’s a taste of some of the incredible talent that comes through our distribution community. For this installment of staff picks we’ve lovingly hand-picked some choice LANDR Distribution releases for the dying days of summer and the onset of fall. It’s the perfect playlist to celebrate cooler days and cozy evenings. You’ll find everything from wistful ambient soundscapes, Swedish experimentalism to Nigerian boom-bap reggaeton. 1. Tiger Mask – SinaiThe minimal three-part guitar, bass and drum arrangements come to a head on the final track of Tiger Mask’s first EP. Sinai is a shifting midwest emo, indie rock style ballad. Its wandering lo-fi guitars, melancholic vocals and longing chords build nicely into a booming final verse. Sounds like: American Football, Broken Social Scene 2. Simon the Magpie – MicrowaveElectronic experimentalist Simon the Magpie came out with an excellent full-length album this summer. The stand-out track for me was the swirling and spaced-out mixture of bells, synths, samples and percussion on “Microwave”. Simon has a lot on the go these days. Check out his YouTube channel for funny yet educational content about music gear, production and a… barbed wire bass? Sounds like: Stereolab, Animal Collective 3. ES.KAY – End of the WorldMontreal rap producer ES.KAY recently came out with his new single “End of the World”. The neo-soul rap and R&B bop is a hot track with a great hook at the chorus and strong rap performances throughout. It’s an excellent offering from a great independent rapper that’s emerging from Montreal’s increasingly hot hip-hop scene. Sounds like: ASAP Ferg, Big Sean 4. Imani Rosee – Real Woman“Real Woman” is the impressive debut single from Imani Rosee. The neo-soul songwriter puts out an incredibly powerful vocal performance on the track. But it’s the empowering message of the song that hits hardest when she sings--I don’t need time by my side/ No I don’t need pride/Cause I’m a real woman.
It’s an inspiring debut from a budding new artist. Sounds like: Solange, SZA 5. Patient Hands – Wash My HandsSweeping ambient soundscapes that oscillate in and out best describe Patient Hands’ new track “Wash My Hands”. The calming five-minute track features sprawling synth pads and drowned out vocals that create a potent minimalist ambient track. It’s the perfect background music for a sunny but crisp fall morning. Sounds like: Time Hecker, Oneotrixpointnever 6. Hannise – Blue Jungle“Blue Jungle” is the new dancey house track from producer Hannise. It’s a classic sounding electronic jam with swooping bass, samba inspired drum programming and some tasty piano chords. For a chilled-out dance track, this is an excellent offering from a young new producer.
Sounds like: KAYTRANADA, Project Pablo 7. Damilfice – Bumba“Bumba” is the new pop-reggaeton single from Nigeria based producer Damilfice. It’s a classic reggaeton track with sensual singing and dancey drums. If you’re looking for the perfect track for a (small) party at sunset, this track will get everyone dancing. Sounds like: Daddy Yankee, PARTYNEXTDOOR
The post Staff Picks: 7 LANDR Distribution Artists We Loved in September appeared first on LANDR Blog. from LANDR Blog https://blog.landr.com/staff-picks-september-2020/ via https://www.youtube.com/user/corporatethief/playlists from https://stevehartcom.tumblr.com/post/629897781359853568
What is an 808? 7 Ways to Make Huge 808 Kicks: via LANDR Blog
The 808 is one of the most iconic sounds in modern music. It’s incredible that a drum sound that was created in the 80s is still so consistently used and sought after today. You’ll hear 808s in pretty much every trap track in existence. It’s used extensively in pop music and most other forms of electronic music too.
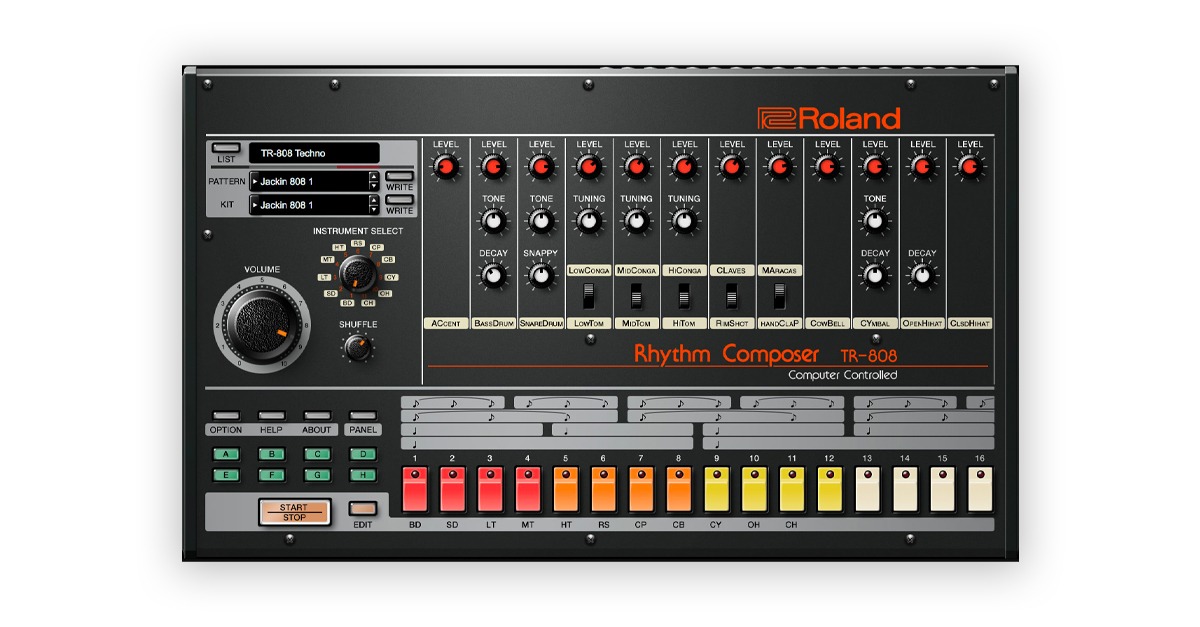
So what makes an 808 so important to producers and how can you get pro sounding 808s in your tracks? In this article, we’ll look at why the 808 is such an appealing sound, where it came from and how to make tracks with perfect 808s. What is an 808?808s are a type of electronic percussion sample that originates from the Roland TR-808 drum machine. They’re characterized by a punchy low-end subby-ness that is easily tunable to different pitches. The original TR-808 comprised programmable kick, snare, low tom, mid tom, hi tom, clap, cowbell, open hi-hat, closed hi-hat, low conga, mid conga, hi conga, clave, rimshot, maracas and cymbal sounds. 808s are based on static noise that is carefully sound designed to electronically re-create the strike of a beater and resonating drum head. Generally, that means a loud attack and a quick resonating decay. But today, 808 drums don’t always sound like the original 808s of the TR-808. Producers have spent a lot of time twisting and sculpting the classic sounds into their own versions, adding distortion, playing with attack and decay, adding compression and more. Just search 808 on an online sample market and you’ll hear hundreds of different versions. TR-808 originsThe 808 sound originated from the Roland TR-808. This drum machine defined the sound of techno and house in the 80s and 90s.
Beyond dance music, the drum machine inspired early hip hop producers like Rick Rubin and Afrika Bambaataa to pioneer the 808 laden sound of 90s hip hop. It’s a rare piece of vintage gear that’s still sought after today.
The 808 bass was of particular interest to these early hip-hop producers. That’s why today 808 generally refers to the widely used 808 bass drum sample. But still, the snare, clap, cowbell, cymbal hi-hat and other 808 sounds are well-loved and heavily used by many producers. The 808 bass’ tendency to rattle trunks and shake club walls gave them an ominousness and intensity that worked well with the lyrics rappers we’re writing during the early 90s. It wasn’t long until producers began tweaking the TR-808 stock sounds to create even more hard-hitting versions of the subby kick. How to make great 808sFortunately, you don’t need to shell out thousands and buy a vintage drum machine to get an interesting and authentic 808 sound. In fact, the modern 808s you hear in trap and electronic music have usually gone through a ton of processing to make them boomier and more distorted. There are many ways to affordably create great sounding 808s, let’s take a look at 7 of the most common 808 production techniques. 1. Start with a great 808 sampleTo get started with 808s you need a good sample to work with.
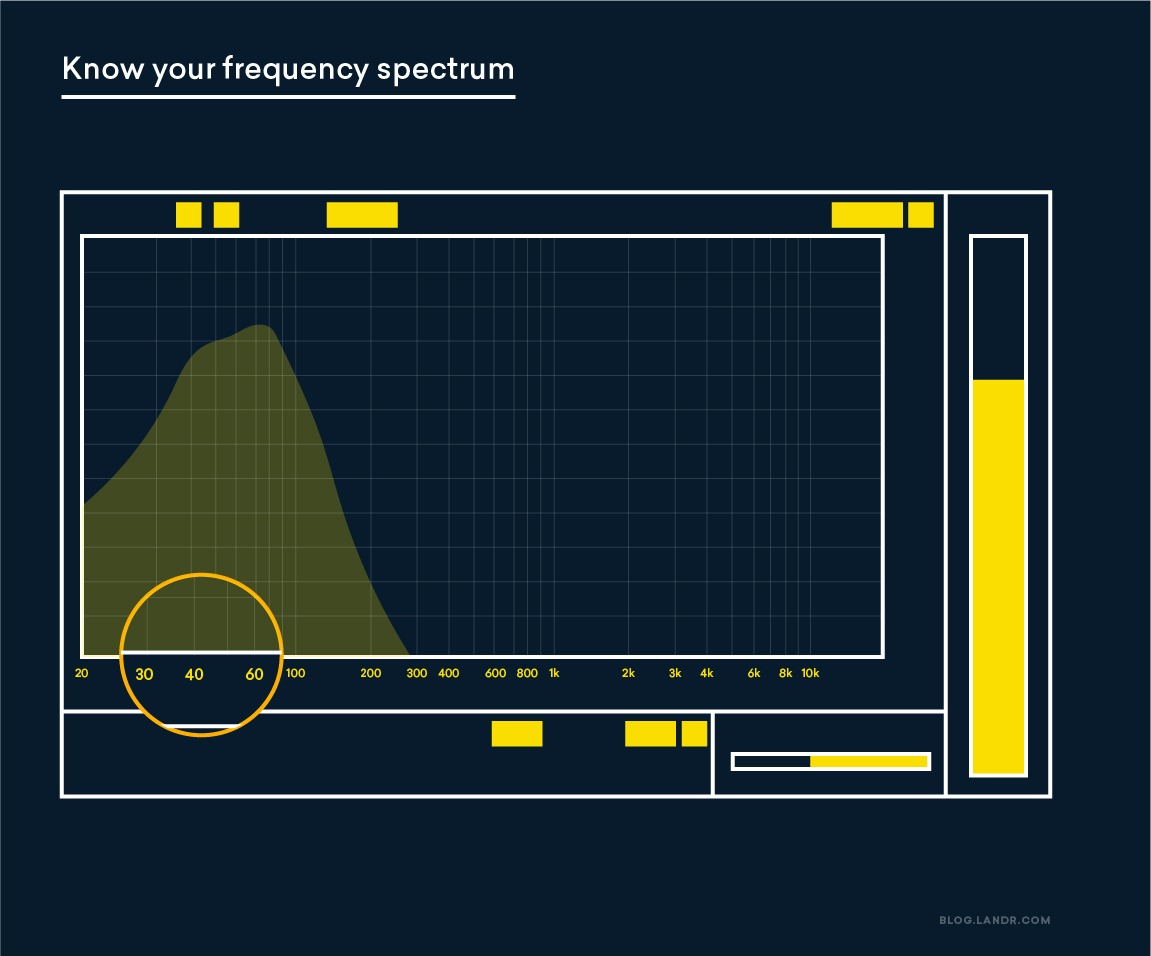
Your DAW most likely comes with a few options, but if you’re looking for a specific kind of 808 you might want to turn to an online samples market like LANDR Samples. You’ll find 1000s of 808s designed by the industry’s best producers. 2. Tune your 808808s are essentially a short sub-oscillator frequency burst. That means they oscillate to a specific pitch. If your 808s aren’t tuned properly they won’t sound right in your arrangement. So make sure you tune your 808s to the key of your track before writing them in. We’ve written articles about finding the key of your track before, if you need help. 3. Know your frequency spectrum808s by default will take up a ton of space in the low-end of your mix.
The main concern here is that your 808 sits the more powerful range of the sub-frequency spectrum—ideally above 30Hz. If your 808 is too subby it won’t have any power, just make sure your aren’t getting into higher bass frequencies either. Really, the ideal sub frequency range lies between 30Hz and 60hz.
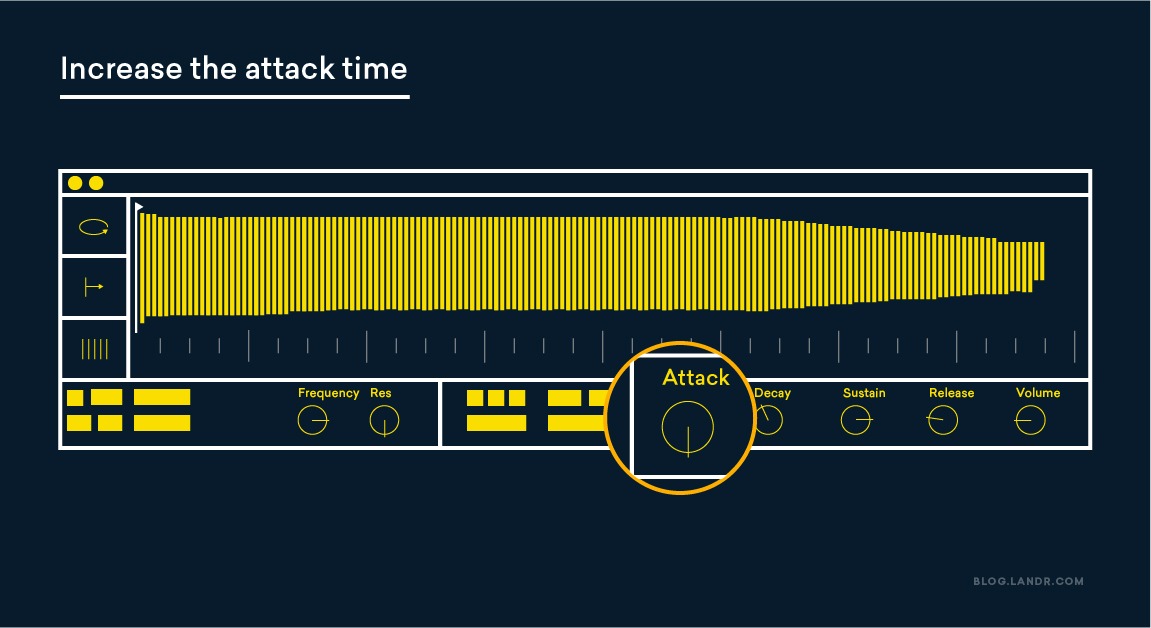
Hot tip: Most speaker systems struggle to reproduce frequencies below 40 Hz. Take extra care around these ultra-low frequencies and make sure to set your high pass filter high enough to deal with them. 4. EQ your 808s to the bottom of your mixWhen you’re using 808s there’s no debate—the 808s are the only thing that should occupy the bottom end of your mix. That means you must EQ some of the low-end out of your kicks and synth bass frequencies. Otherwise, you’ll weaken the impact of your 808s. 5. Increase the attack time on your 808One way to distinguish your 808 bass from the other sounds in the low-end of your track is by increasing the attack time of your 808 bass. This delays the peak volume of your 808 hits so that you hear the kick first and then the swell of the 808 sub frequencies. Increasing the attack time is what helps round out the overall sound of your kick.
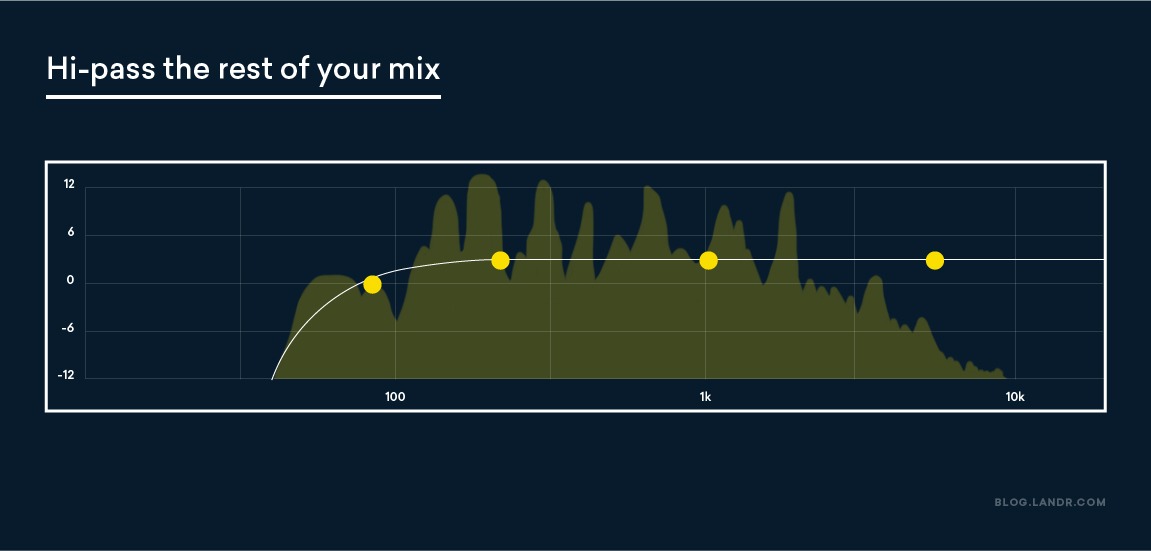
6. Clean up the lows with a hi-pass filterFor any part of your track that isn’t in the low-end the EQ process to bring out your 808s is simple—hi-pass filter any low-end frequencies. This ensures that instruments like hi-hats and snares aren’t taking up any of the low-end room that your 808 needs.
7. Sound design your own sampleYou can use pretty much any single cycle waveform to develop your own 808 sound. The original 808 was made with a white noise sample after all.
In this video, Andrew Huang shows a process anyone can follow to create their own personal 808 bass sound. There’s some pretty technical sound design concepts at play, but if you want the learn the ins and outs of what’s inside an 808 this is the perfect tutorial. Celebrate the 808It’s not very often that a single sound or piece of gear sparks an entire new generation of music. But the TR-808 and the 808 bass absolutely falls into this category. There’s nothing better than the feeling of hearing your track pound through a club’s sound system with the help of a great sounding 808 kit. Now put some 808s in your next track! The post What is an 808? 7 Ways to Make Huge 808 Kicks appeared first on LANDR Blog. from LANDR Blog https://blog.landr.com/what-is-an-808/ via https://www.youtube.com/user/corporatethief/playlists from https://stevehartcom.tumblr.com/post/629618426026033153
Music Intervals: How Notes Work Together: via LANDR Blog
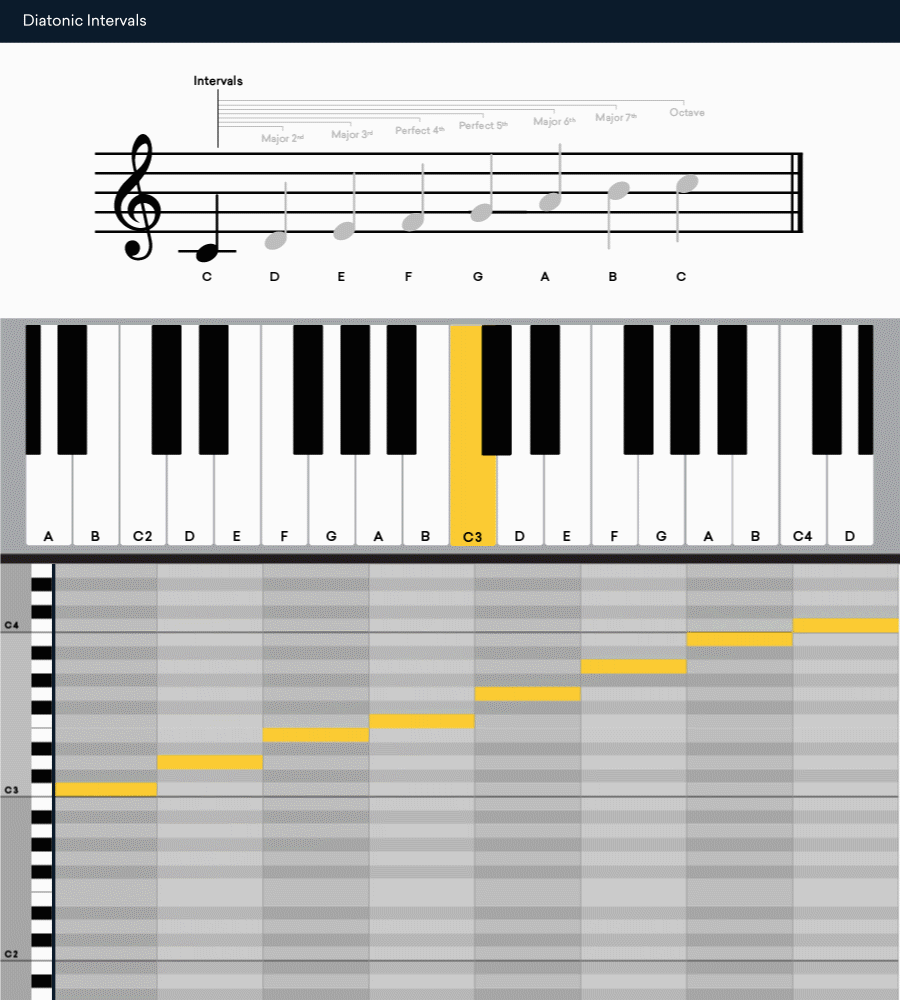
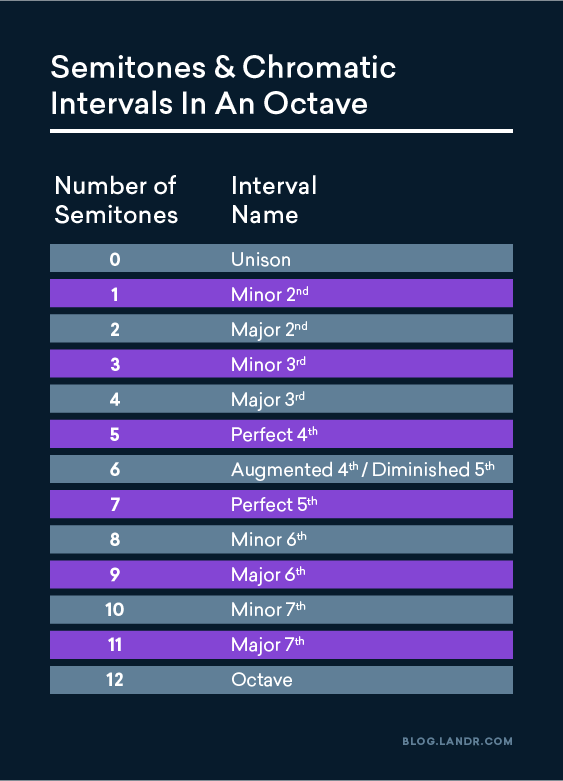
Music intervals are an essential part of every musician’s journey with music theory. They’re the basic building blocks that make it possible to assemble chords, map out progressions and construct melodies. But intervals can be difficult if you haven’t seen them before. With such a fundamental topic, it can be confusing just to get started. Even so, the benefits are worth it. Knowing what intervals are, how to identify them and how to recognize them by ear will give you the tools you need to progress with music theory. In this article, I’ll explain what intervals are, how to learn them and what they can do for your music. Let’s get started. What are intervals in music?Intervals in music are the distance between two musical notes. An interval can be between two notes that sound at the same time like in a chord, or between two notes next to each other like in a melody. Intervals can be any distance apart in frequency, but in western music they are almost always between notes of the diatonic scale. If that sounds complicated, all it means is that intervals are the number of semitones between two notes in a chord or melody. Why learn music intervals?Intervals might seem like a dry theoretical topic. But knowing how they work is a basic musicianship skill that will unlock creativity for songwriting, arranging and improvising. If you know your intervals well you can build better chords, recognize progressions and even play melodies by ear. If that weren’t enough, almost any concept you might want to learn in music theory requires a solid knowledge of intervals to progress. In fact, hesitation with intervals is one of the main barriers to getting better at music theory for self-taught musicians. With all those possible benefits in mind, here’s everything you need to know to get started with intervals. Interval numbersEach interval has a number that tells you the distance between the two notes. The number comes from the amount of scale steps away from the starting note. If you imagine that the starting note is the tonic in a major scale, you can simply count each scale step until you get to the other note in the interval. Interval qualityInterval qualities are the same as the chord qualities you might be used to already—major, minor, diminished and augmented. All these qualities come from how each interval relates to the major scale. For example, the bright, happy sound of the major third is the same interval as the third degree of the major scale. Intervals that don’t have a major or minor quality like fourths and fifths are called “perfect” if they’re the same distance away from the starting note as they appear in the major scale. That’s why you can think of the major scale as the template for the basic—or diatonic—intervals. Here’s the C major scale written out with each interval and its quality to help you visualize it.
So far we’ve only talked about diatonic intervals—the intervals found in the major scale. To get the rest of the musical intervals you can raise or lower each diatonic interval by a half step to fill in the rest of the keys on the keyboard. For example, lowering the second note in the major third by one semitone would make it a minor third—the same note as the third degree of the minor scale.
Harmonic intervalsHarmonic intervals are intervals that sound at the same time in a chord. Knowing your harmonic intervals can help you identify chords by ear and analyze their construction. You’re probably familiar with harmonic intervals if you’ve ever built up chords like triads and seventh chords one note at a time. Here’s a C major triad with the interval relationships shown.
Melodic intervalsMelodic intervals are the distance between notes that are next to each other. These intervals have a direction as well as a number and quality. If the melody rises up from the starting note, you add the direction to the interval’s common name--a major third up. If it falls down to reach the note you’re comparing it with, it’s the opposite--a perfect fourth down. When you can recognize each new interval in a melody by ear, you can write it or play it without having to learn from a tab or sheet music. Even if you can already remember melodies well, learning your melodic intervals will help you translate them to your instrument—and your DAW. But melodic intervals don’t just help with single lines. The root note of each chord in a progression is separated from its neighbor by a melodic interval.
If you can tell the difference between adjacent root notes of a chord, you can learn chord progressions by ear! How to recognize intervalsThe most useful skill with intervals is recognizing them—by ear, in sheet music or in your DAW’s piano roll. It takes a bit of practice to get it down, but everyone can learn if they put in the effort. You can practice by playing different intervals using a piano VST and getting used to how they sound. Once you have a feel for them you can try an online ear trainer to keep getting better. But even seasoned musicians use a surprising trick to get the sounds of different intervals in their ears. There are a few common melodies that are easy to remember and feature certain intervals prominently. There are lots of options to choose from, so you may find others you prefer, but here are some tunes you can use to remember your intervals. 1. Minor second — Jaws theme 2. Major second — Happy BirthdayWho hasn’t sung this song at some point? Everyone knows the tune, but the first interval in the melody is a major 2nd—up and down! 3. Minor third — Seven Nation Army The catchy octave riff that became a sports stadium chant features a nice clear minor third up and a down for the first interval in the pattern. 4. Major third — Ob-la-di Ob-la-da 5. Perfect fourth — Harry Potter/Star Wars Legendary film composer John Williams has used perfect fourths as the melodic lynchpin of some of his most well-known themes. You can hear it as the first interval in the melody of “Hedwig’s Theme” from the Harry Potter series and in the “Force Theme” from Star Wars. 6. Augmented fourth/Diminished fifth — The Simpsons The iconic Simpsons intro music is one of the best examples to recognize this more uncommon interval. It’ll pop right into your head once you hear it. 7. Perfect Fifth — Scarborough FairSimon and Garfunkel’s brooding take on this traditional song features a strong perfect fifth up for the melody’s first interval. It’s also a great example of the Dorian mode to boot! 8. Minor 6th — In My Life The opening guitar figure of this classic John Lennon song features an exposed minor 6th up. Even so, the chord still sounds “happy” overall since it’s a major triad in second inversion! 9. Major 6th — Take The ‘A’ Train 10. Minor Seventh — Josie 11. Major Seventh — Take on Me A-ha’s 80s hit contains a memorable major 7th up in the chorus melody—and one of the best music videos ever made. 12. Octave — Somewhere Over the Rainbow An octave might seem easy, but singing this interval on command can be tough without a song in mind. Luckily, the standard tune “Somewhere Over the Rainbow” contains a memorable octave skip in the first phrase. Interval trainingIntervals are so important to basic music theory that it’s hard to get too far without learning them. But if you made it through this article you’ll have a good start with intervals already. Now that you have some background with intervals in music, keep going on your journey with music theory. The post Music Intervals: How Notes Work Together appeared first on LANDR Blog. from LANDR Blog https://blog.landr.com/music-intervals/ via https://www.youtube.com/user/corporatethief/playlists from https://stevehartcom.tumblr.com/post/629539158562668544
How to Choose A Reference Track For A Better Mix: via LANDR Blog
No mixing environment is perfect. Even if you have acoustic treatment, quality monitors and great headphones, there’s always a bit of guesswork in the final stages of your mix process. To get good results you need to know what you’re up against—and how to work around it. Reference tracks are how you get that perspective. They’re an incredibly useful tool to help you judge your mix objectively. But what are reference tracks? Which ones should you use, and how do you work with them? In this article I’ll explain what reference tracks are, how to choose your own and some of my top picks for different mix situations. Let’s get started. What are reference tracks?Reference tracks are recordings with desirable sonic features that engineers use to evaluate their work-in-progress mixes. Many pro engineers have go-to reference tracks they rely on to bring their work closer to their vision for the final mix. By comparing back and forth between a reference track and your mix, you can evaluate the changes you need to make for a better finished product.
How to use reference tracksIt’s easy to get lost in your mix and lose your sense of direction. Checking in with a reference track as you work is one of the best ways to avoid it. All you need to do to use a reference track is drag it into your mix session and set up a way to toggle back and forth. As you go you’ll get a sense for the critical features you need to compare to evaluate your sound, you’ll see why this technique is so useful. You might not have caught these issues if you didn’t take a step back to mix reference. Using reference tracks is easy if you remember a few basic rules:
For a deeper dive into how to do effective mix referencing, check out our guide. How to choose a reference trackThe beauty of reference tracks is that you can use almost any audio material, as long as it fits into your workflow and provides good comparison.
In general, you want to choose a reference track that demonstrates the best qualities you’d hope for in your own mix. That’s completely up to you, so the best approach to choosing a reference track is to experiment and follow your ears. Start with tracks you love and listen attentively for their production quality. If you listen critically, you’ll start to understand the sounds you prefer and how to recognize them in your own mixes. If you need a place to start, here are some qualities to look for when you choose a reference track:
Other ways to referenceReference tracks are traditionally used within a DAW session for direct comparison. But modern mix referencing is evolving. There’s more ways than ever to use reference material in your workflow. Proper referencing requires precise level matching to work. That means referencing in-progress mixes against finished masters outside of your DAW isn’t always possible.
That’s where instant AI powered mastering comes in. A LANDR mastered track will be close enough to the level of a finished recording for you to use it as a good reference. That means you can mix reference anywhere—in your car, on your home stereo, or on earbuds on the bus. That’s the precise information you need to make good decisions about your mix. If you have to make any adjustments to the mix you can just master it again with no turnaround time and no extra cost. My favorite reference tracksEveryone has to find the reference tracks they like best. It can be a very personal choice. To help you get started I’ll list a few of the reference tracks that I’ve used and what I like about them. 1. Lonesome Tears — Beck The mix features a very broad span of frequencies from deep sub bass to smooth and airy extended highs. You can really get a sense of the ultra wide spectrum from the spacious string sound. I sometimes use this track to judge the overall frequency extension of a mix I’m working on. 2. Strawberry Swing — Coldplay It’s an excellent example of the “Brauerization” compression-centric style pioneered by top mix engineer Michael Brauer. Every element feels like it’s in focus at the same time, like looking at an HDR photograph. This reference track can help you get a sense of what masterfully applied compression can sound like. 3. Out on the Weekend — Neil Young Engineer Elliot Mazer has stated that no compression or limiting of any kind was used during the mix. That makes it great for listening to natural transients and the attack and decay of acoustic instruments. 4. Inside Out — Spoon Spoon’s They Want My Soul was mixed by Dave Fridmann at his Tarbox Road Studios in upstate New York. Fridman’s style is notorious for its intense saturation, bordering on distortion. “Inside Out” features bold layered electronic drums and samples with aggressive saturation that somehow never gets fatiguing. I sometimes use this track to judge if i’ve added too much harmonic distortion or if any saturated tones are too harsh. Reference materialBringing reference tracks into your workflow is part of how you mature as a producer and hone your skills. No matter what genre or style you work in, there’s a reference track you can use to pull your mix in the right direction. Now that you know about reference tracks and how to choose one that works, get back to your DAW and keep chasing your perfect mix. The post How to Choose A Reference Track For A Better Mix appeared first on LANDR Blog. from LANDR Blog https://blog.landr.com/how-to-choose-a-reference-track/ via https://www.youtube.com/user/corporatethief/playlists from https://stevehartcom.tumblr.com/post/628712457653846016
The 10 Best Acoustic and Electric Guitar Loops Right Now: via LANDR Blog
There’s no instrument that’s more associated with pop music than the guitar. It’s been a staple in almost genre of modern music since the 60s. Even today it’s still used in trap, lo-fi and electronic music. But writing and recording a guitar part can be a challenge, especially if it’s not your main instrument. To help you get started making music faster, we’ve compiled this list of the 10 best guitar loops available right now. 1. Ben Pleasant’s Guitar Sample Pack Vol. 2
Saturated and drenched in chorus is maybe the best way to describe the characteristics of Ben Pleasant’s second guitar sample pack. Full of trendy lo-fi inspired jazz chord voicings, plucky melodies and somber soundscapes—you’ll a greeting starting point for your next track. Our favorite sample from the pack: anewmorning.acousticguitarchords.100BPM.Eminor 2. Fender Wasteland
Take your tracks into the stratosphere with Fender Wasteland, the new Fender inspired guitar-laden sample pack from Kits Kreme. You’ll find spaced out samples, melody loops and chord loops that feature sunny Stratocasters, low-key Jazzmasters and twangy Telecasters. Our favorite sample from the pack: Guitar Chord Filtered G Minor 100BPM 3. Indie Pop Guitar 1
The glint of polished guitars in stage lighting and the roar of a crowd behind a crunchy guitar lick is what Indie Pop Guitar evokes for me. Get those classic sounding guitar riffs and find the perfect starting point for your next alt-rock inspired track. Our favorite sample from the pack: 07 Electric Guitar IP1 11 – 101 BPM – C 4. Daydreams – Lofi Guitar Jams
It’s not a secret that the guitar is a prominent part of most lo-fi style hip-hop—it just sounds so good to through a little bit of warble and saturation on a guitar part. That’s exactly what you’ll find in Osaka Sound’s Lofi Guitar Jams sample pack. Look here first for the perfect guitar loops for your next lo-fi track. Our favorite sample from the pack: OSDD_Guitar_Chord_10_keyGmaj_90bpm 5. Rockstar Guitars
Forget hair metal, trap and hip-hop are where the world’s newest rockstars are born. That’s why many of the world’s biggest trap artists are gravitating to the guitar. This sample pack delivers on the new trend with brooding guitar parts, emotional melodies, country pickin’ and heavy licks that are ready for any emo trap track. Our favorite sample from the pack: Dark Guitar Melodic 170 BPM D#min 6. Funked Up Guitars
Funked Up Guitars is exactly what it sounds like: a big selection funky guitar parts. From chunky chords, noodling solo’s and plucky notes–here’s a great selection of every classic funk guitar sound in the book. Our favorite sample from the pack: gt F127 05 7. Dave Foreman Composition and Samples Vol. 1
Dave Forman is a guitar virtuoso who’s worked with everyone from Bruno Mars to Snoop Dog. If you’re looking to sample the best of the best in your tracks, Dave Forman’s sample pack is a go-to. Our favorite sample from the pack: Uncle-Dave-Riffs_keyBbmin_92bpm 8. Paradise Guitars
Sunny guitar parts that remind you of summer, sun-soaked days at the beach and warm evenings are what this sample pack is all about. Get beachy riffs on electric guitar and acoustic guitar and add a ray of sunshine to your track. Our favorite sample from the pack: Guitar Melodic Chord 102BPM A Minor 9. Lo-Fi Guitars
Low-key and cloudy is the best way to describe the feeling this sample pack evokes. For that classic saturated, hissing, tapey lo-fi sound that beatmakers love these days, this sample is worth perusing. Our favorite sample from the pack: SLFG_068_Guitar_80_BPM_Emin_FX 10. African Guitars Vol 2
Africa is where most necked string instruments originated from, so it’s no surprise there are many different styles of guitar playing from different African cultures. This sample pack comes with a handful of guitar loops that are inspired by the Mbira and Soukous style. Our favorite sample from the pack: 100 BPM – D – Song 1 – Rhythm 2 – pan left
The post The 10 Best Acoustic and Electric Guitar Loops Right Now appeared first on LANDR Blog. from LANDR Blog https://blog.landr.com/guitar-loops/ via https://www.youtube.com/user/corporatethief/playlists from https://stevehartcom.tumblr.com/post/628353852604891137 |


 RSS Feed
